Create a serverless chatbot for Telegram using Vercel - the ultimate guide

I love helping people to automate their lives.
Back in 2018/19, I spent a lot of time building automated chatbots using the Facebook Messenger platform. It was a great way for businesses to automate interactions with their customers. More recently, Facebook have made it much harder to build bots on their platform by limiting their API, especially if you're a European user.
In the past year, I've moved over to using Telegram to build bots and often use them to integrate with other online services and APIs. They have their own fully-featured bot API which makes it much easier to interact with.
Telegram messages
Permalink to "Telegram messages"Telegram supports two ways of interacting with the messages that users send to its bots. The first is long polling. This is similar to standard polling techniques where the client requests data from the server at regular intervals. With long polling, there's an expectation that the server may not reply instantly and then the client holds open the request and waits. This works if you are happy with deploying bot server code and infrastructure that never shuts down.
The alternative way to receive messages from Telegram is using webhooks. This method is event-driven and Telegram will send you a HTTP POST request only when a new message is sent from a user. This fits perfectly with the idea of event-driven architecture such as serverless functions.
Let's look at using Telegram's API and Vercel serverless functions to create a basic bot and deploy it to their cloud hosting.

Creating a new Telegram bot
Permalink to "Creating a new Telegram bot"The first task is to create a new bot that our user can interact with. To do this we must talk to the Botfather. This is Telegram's own bot which creates and updates new bots. Either start a new chat with Botfather or click on this URL to open the bot in Telegram: https://t.me/botfather
To create a new bot we must send it the /newbot command. It will ask you for a name and username of the bot. The name is displayed in the contact details. The username is a shortname which is used for mentions, @mybot for example, or in t.me links for sharing. The username has to end in bot. As bot usernames are unique, you can see from the screenshot that it took me a couple of attempts to get the bot name MarcDevBot that hasn't already been used by another developer.
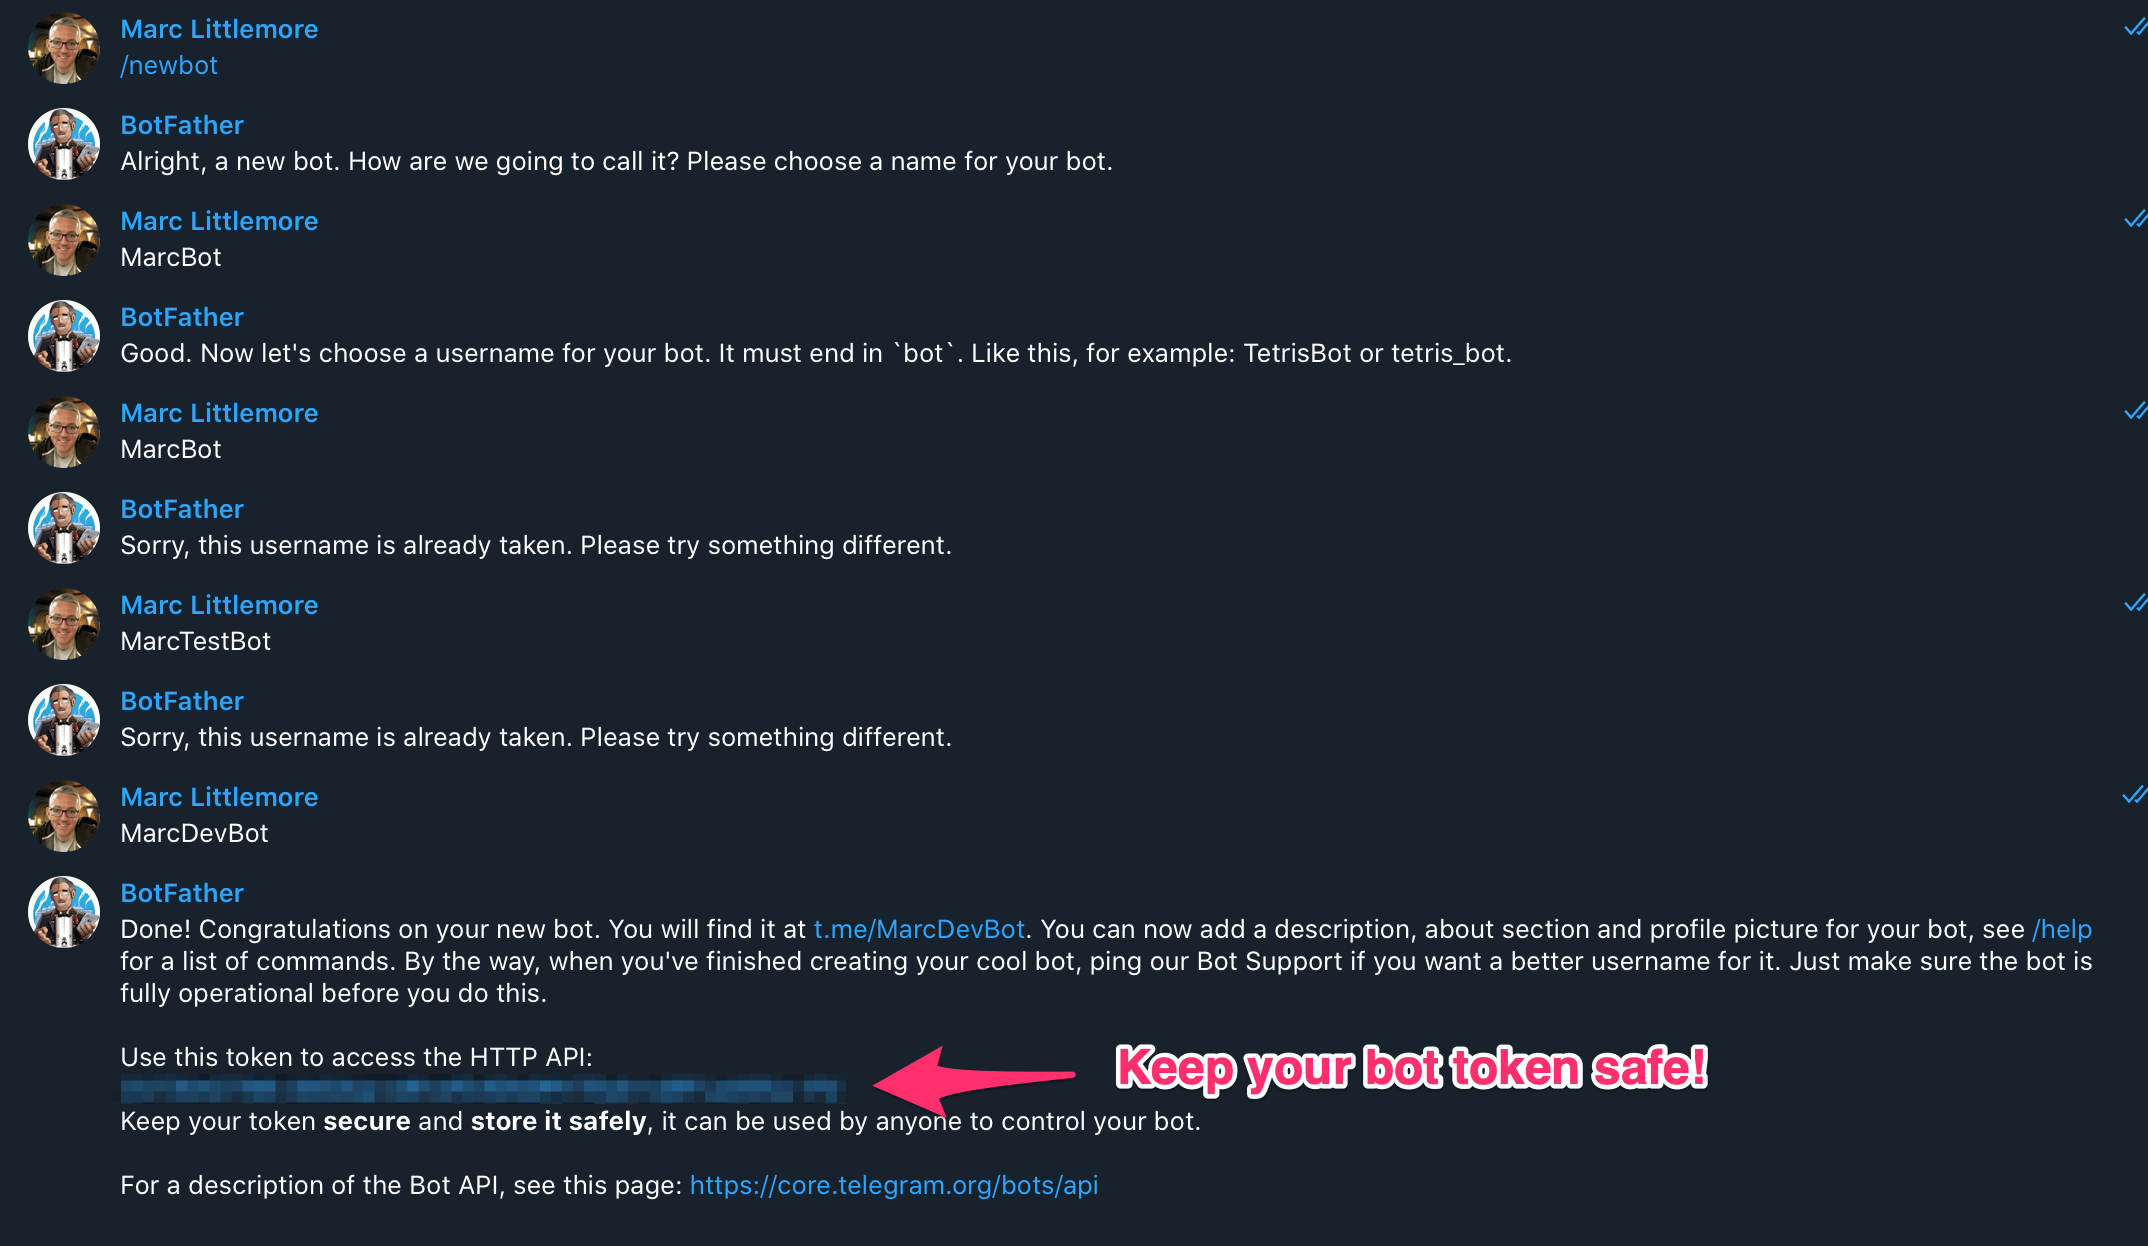
Botfather will send you an authorisation token which is a long string. You use this to send requests to the Telegram Bot API.
Make sure you keep your Telegram authorisation token safe and don't share it with anyone. If you do, they can send messages to users on behalf of your bot by using it.

Vercel account
Permalink to "Vercel account"To deploy our chatbot code to Vercel, we must create a Vercel account. Head to the signup page and create a new account using your GitHub, GitLab, or BitBucket account. If you've already got one, then that's great!
Creating our bot serverless function
Permalink to "Creating our bot serverless function"We're going to use Node.js and JavaScript and a couple of npm packages to create a serverless function. I'm going to assume that you have Node.js set up on your local development machine and understand the basics of adding packages to a project using a command terminal.
Let's get the project set up. Create a directory called test-bot and change directory into it:
mkdir test-bot
cd test-bot
Next we'll create a basic Node.js project using npm. Here we're skipping the part where we fill in the details of the project into the package.json file. I'll leave that for you to do later.
npm init -yAs we want to deploy our serverless function using Vercel, we must install their command line tools. We can add the vercel application as a global dependency, so that it's available everywhere and not just in our project, like this:
npm install -g vercelNext we can login to vercel which allows it to know which account we're deploying the code to.
vercel loginVercel will send you an email with a link to verify your account. Once you click on that link it will save the correct tokens to your machine to allow you to deploy your application.

Vercel serverless functions
Permalink to "Vercel serverless functions"Vercel can be used to deploy any frontend application to its cloud hosting but it also allows you to run serverless functions, using AWS Lambda and Google Cloud Functions under the hood. Making a new serverless function is easy. Vercel wants a directory called /api in the root of your project. Inside that directory you can add a JavaScript, Go, Ruby, or Python exported function and it will appear as an API route. Let's add a new function to handle our Telegram messages.
Create the /api directory in the root of your project.
mkdir apiIn your editor of choice create a file called webhook.js in the /api directory.
module.exports = (request, response) => {
    response.json({
      body: request.body,
      query: request.query,
      cookies: request.cookies,
    });
};
This will expose an API function on the following path /api/webhook. For basic usage, the name of the file represents the last part of our path (i.e. webhook.js becomes /webhook). It always sits under the /api path unless you change it through configuration. We can test that the code works correctly in our browser by running a development version of Vercel using the following command:
vercel devAs this is the first time you've run the development build, Vercel will ask you a few questions as shown below.
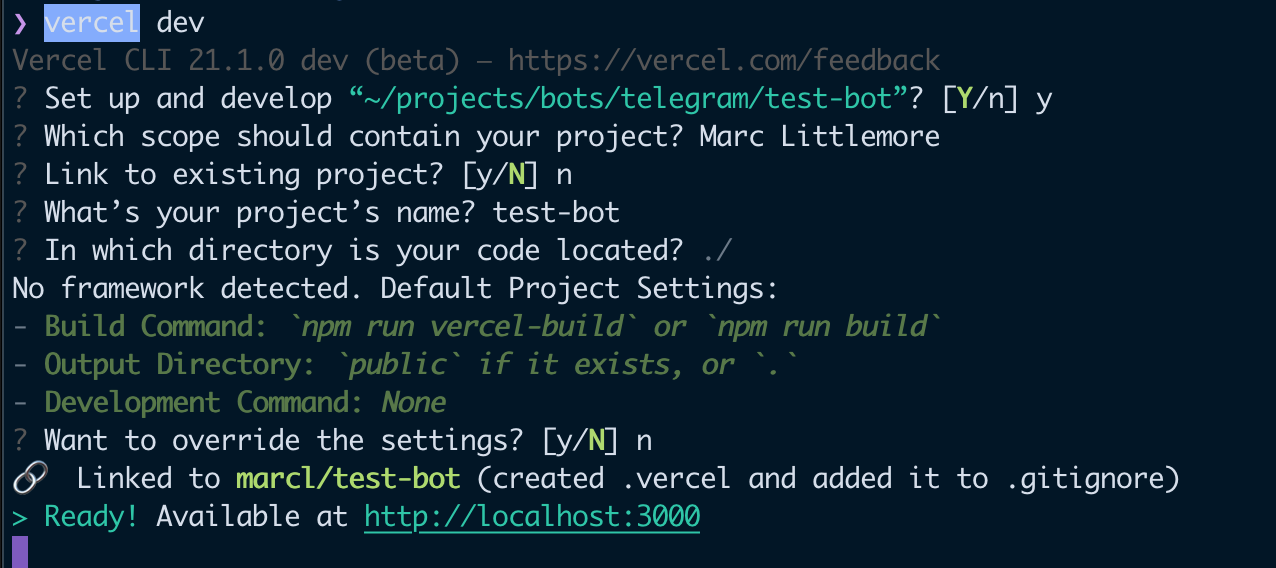
At the end of the process it will expose an HTTP endpoint on port 3000 by default. Hit this URL in your browser and it will make a GET request to your newly exposed serverless function.
http://localhost:3000/api/webhook?hello=world
You should see a similar response to the following:
{
  "query": {
    "hello": "world"
  },
  "cookies": {
    "_ga": "GA1.1.10178417.1582143681",
    "__smToken": "2PgmPwvNz7Ss6Os5nQexTPAl",
    "_gid": "GA1.1.327749069.1610568137",
    "io": "WRSUGikIUBDcMAQ_AAAZ"
  }
}
Yay! Our serverless function is working locally and is responding with a JSON response. 🎉
Creating the Telegram bot message handler
Permalink to "Creating the Telegram bot message handler"Telegram expects to call a webhook by sending us a POST request when a message is entered by the user. Let's build the message handler to receive this. We can install an npm package called node-telegram-bot-api which will allow us to easily receive and send messages to a Telegram bot.
npm install node-telegram-bot-apiLet's update our webhook API to receive the messages that Telegram sends us. A Telegram message contains a JSON body with a message property in it. There are other messages that Telegram can send us but this function will only handle text messages for now.
In order to send messages using the Bot API, we need to use the authorisation token that the Botfather sent us earlier. We don't want to hardcode this as a variable in our code as this would be a security risk. Instead we'll set it as an environment variable that we can use.
Copy the following code over the webhook.js code you wrote earlier.
// https://github.com/yagop/node-telegram-bot-api/issues/319#issuecomment-324963294
// Fixes an error with Promise cancellation
process.env.NTBA_FIX_319 = 'test';

// Require our Telegram helper package
const TelegramBot = require('node-telegram-bot-api');

// Export as an asynchronous function
// We'll wait until we've responded to the user
module.exports = async (request, response) => {
    try {
        // Create our new bot handler with the token
        // that the Botfather gave us
        // Use an environment variable so we don't expose it in our code
        const bot = new TelegramBot(process.env.TELEGRAM_TOKEN);

        // Retrieve the POST request body that gets sent from Telegram
        const { body } = request;

        // Ensure that this is a message being sent
        if (body.message) {
            // Retrieve the ID for this chat
            // and the text that the user sent
            const { chat: { id }, text } = body.message;

            // Create a message to send back
            // We can use Markdown inside this
            const message = `✅ Thanks for your message: *"${text}"*\nHave a great day! 👋🏻`;

            // Send our new message back in Markdown and
            // wait for the request to finish
            await bot.sendMessage(id, message, {parse_mode: 'Markdown'});
        }
    }
    catch(error) {
        // If there was an error sending our message then we
        // can log it into the Vercel console
        console.error('Error sending message');
        console.log(error.toString());
    }

    // Acknowledge the message with Telegram
    // by sending a 200 HTTP status code
    // The message here doesn't matter.
    response.send('OK');
};
Testing our function locally
Permalink to "Testing our function locally"Telegram needs to send us a message to a public URL which has SSL/TLS encryption. As vercel dev only exposes an HTTP and not an HTTPS endpoint, we need to expose an HTTPS endpoint to the public internet so that the Telegram server can send us messages. We can do this using a great library called ngrok. This allows us to expose a secure connection to our local server.
Let's install ngrok as a development dependency for our project:
npm install --save-dev ngrokTo expose a web sever on port 3000 to the internet we can now run this command:
ngrok http 3000ngrok will now be up and running and will give us two URLs: one for HTTP and another for HTTPS. You need the HTTPS URL to set as the webhook URL for Telegram to communicate with. Note that ngrok will generate a unique URL each time you run it. If you restart it then you'll also have to update the Telegram webhook URL.
Setting up the Telegram webhook
Permalink to "Setting up the Telegram webhook"Using the ngrok HTTPS URL you were given, we can make a POST HTTP request to the Telegram API using curl to tell it to send messages to our local serverless function. Use the following command to do this. Make sure your replace <YOUR-BOT-TOKEN> (including the <> brackets) and the https://your-ngrok-subdomain.ngrok.io URL to the ones you've been given:
curl -X POST https://api.telegram.org/bot<YOUR-BOT-TOKEN>/setWebhook -H "Content-type: application/json" -d '{"url": "https://your-ngrok-subdomain.ngrok.io/api/webhook"}'If this succeeds then the API will send you the following JSON response:
{"ok":true,"result":true,"description":"Webhook was set"}Testing with the Telegram API
Permalink to "Testing with the Telegram API"Let's run the vercel dev local mode whilst ngrok is running. This will start the vercel development environment and allow the function to receive requests on port 3000. In order to communicate with Telegram's API, we have to set our authorisation token as an environment variable. Replace <YOUR-BOT-TOKEN> with the one the Botfather gave you and run the following command:
TELEGRAM_TOKEN=<YOUR-BOT-TOKEN> vercel devNow let's chat to our bot in Telegram. Start a conversation with the bot you created earlier. Send it any message and you should get a response back.
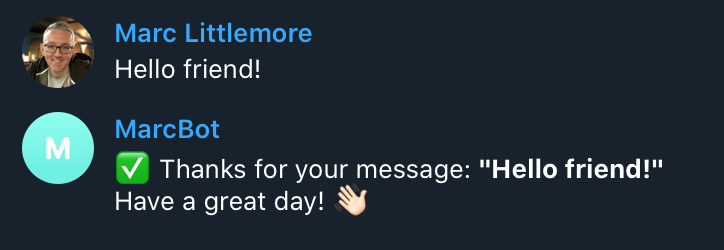
The bot is up and running and responding to messages! 🎉
Deploying to Vercel
Permalink to "Deploying to Vercel"Now that your bot is working as expected locally, let's deploy it to Vercel. Deploying with Vercel is amazingly simple and that's why I love it. Type the following in the root of your project:
vercelVercel will build your project and deploy it to its servers for hosting as a serverless function. It will deploy it to the project name that you created earlier when you ran vercel login. For me this was test-bot.
Before we can switch over to using our production Telegram bot, we need to set up an environment variable for the Botfather authorisation token. There are a few ways to do this but let's set a text variable using the Vercel console for simplicity. Head to the settings area of your project. The URL will be something like this:
https://vercel.com/<your-vercel-username>/<your-bot-name>/settings/environment-variables
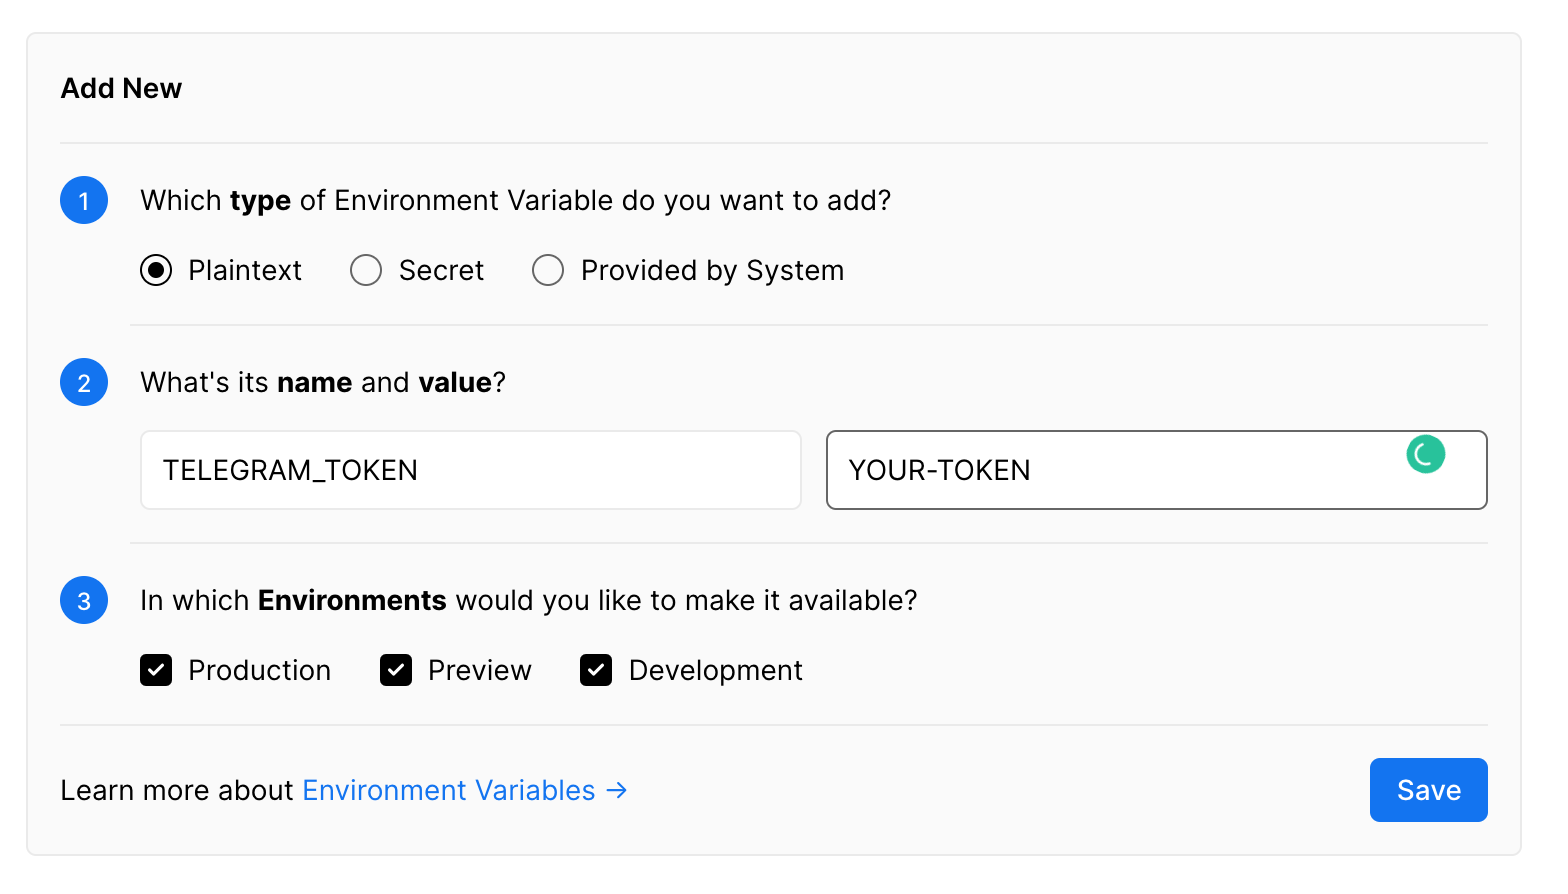
Add a new plaintext variable called TELEGRAM_TOKEN which is what we expect to find in our code. Set the value to the authorisation token that the Botfather gave you earlier and hit save.
Once this environment variable has been added, we'll need to redeploy the application to ensure the serverless function reads it when it starts up. Vercel makes it easy again so run the following command:
vercelAnd finally...
Permalink to "And finally..."Now that we've got our serverless Telegram bot deployed to Vercel, we need to update Telegram to tell it to route the messages to our Vercel function. Set the Telegram webhook using a curl command. Again, don't forget to replace <YOUR-BOT-TOKEN> with the Telegram authorisation token and the project-name.username.vercel.app domain name with your own URL which Vercel gave you when you deployed the application.
curl -X POST https://api.telegram.org/bot<YOUR-BOT-TOKEN>/setWebhook -H "Content-type: application/json" -d '{"url": "https://project-name.username.vercel.app/api/webhook"}'And that's it. You've now got a serverless Telegram bot deployed to Vercel which can respond to user messages. Try typing another message in Telegram to your bot and check that it responds correctly.
What's next?
Permalink to "What's next?"Now that you know how to deploy a Telegram bot using Vercel, it's time to update the code. Telegram has lots of fantastic features. You can send it commands and create a suite of automatic functions. You can use your bot to call out to external APIs to retrieve data for you. Have a think and see what amazing bots you can create!
Give me a shout or reach out on Twitter if you have any questions or need any help!
Useful resources
Permalink to "Useful resources"I've uploaded the code to a GitHub repository here: https://github.com/MarcL/telegram-test-bot Feel free to fork and reuse it how you wish.
Read the Telegram API for some in-depth knowledge of what bots can do.
Take a look at the Vercel documentation to see what other things you can deploy to their hosting.
Want to read more?

Add time and date to your Messenger chatbot with the Chatfuel JSON API
Let's help your customers decide if you're open by adding time and date to your Chatfuel chatbot.
How to validate an email adress using the Chatfuel JSON API
When asking your chatbot user for an email address, how do you know if it's valid? Let's look at how you can validate an email address using the Chatfuel JSON API and a Node.js web server.