Automate Your Static Site Rebuilds with Netlify Scheduled Functions
Never forget to update your copyright footer again!

I laugh every year when I see this meme about updating your website footer:
If you're a developer who has come from the world of Wordpress where using PHP to dynamically update the year in the footer then I'm sure you're wondering what the fuss is about. As PHP is a server-side language, you're constantly rebuilding a page when someone requests a URL.
But if you have a static site then your code only updates when you build it manually and redeploy the latest version. If you have dynamic content on the page, such as a year in your footer, then you have to remember to rebuild the site when the data changes or maybe use some client-side JavaScript.
This site is generated with 11ty which is staticly generated so I need to remember to rebuild my site each year if I want to do something like update my footer. But clicking on a deploy button in the Netlify dashboard is a bit of a faff and I'm likely to forget to do it. So why not automate it? 🤖
Let's start automating
Permalink to "Let's start automating"My original plan for rebuilding my sites was to trigger this rebuild via a cron service, like cron-job.org or Easy Cron or automation platform like Zapier.
I tried using the automation service make.com to schedule the yearly rebuild of my site. However, I soon hit the limits of their free tier which only allows 2 "scenarios" (a set of automation steps) and I wanted to update multiple websites. You could bundle multiple rebuild requests into a single scenario and update each site in a sequence, but then you lack single responsibility and it's harder to debug if anything goes wrong with a single update.
So as my site was already hosted there, I decided to use Netlify.
Disclaimer: I am a Senior Software Engineering Manager at Netlify but I've used their platform for years before I worked there.
Using Netlify to rebuild your site
Permalink to "Using Netlify to rebuild your site"I host all of my sites on Netlify and have done for a long time. Netlify provides you with the ability to rebuild your site via a build hook. This is special kind of webhook, a function that responds to a HTTP POST request, which allows you to kick-off a new build and deployment of your site.
While there are plenty of other options for running scheduled tasks, I thought I'd just move over to using Netlify's scheduled functions to automate this. This has the advantage of having complete control over the code and when the rebuild happens. I can also add in any additional notifications, like sending me a message on Slack or Telegram, and it allows me to commit it to my site's repository as part of the infrastructure, known as infrastructure as code (IaC). This allows me to version my scheduled tasks along with the code and stops me from having to remember which service I used to rebuild the site.
This approach is easy to implement, even for beginners with no prior experience with Netlify functions. So, buckle up and get ready to make website maintenance easy with the power of automation!
Create a Netlify build hook
Permalink to "Create a Netlify build hook"First, we need to create a build hook in Netlify. This is a URL that you can use to trigger a new build and deployment of your Netlify site.
Go to the Netlify dashboard and select the site you want to add your build hook to. Next, go to the "Build & deploy" section and scroll down to the "Build hooks" section. Click the "Add build hook" button and give it a name. I called mine build-production-site as, unsuprisingly, it rebuilds my production website.

Remember that this build hook URL should be considered a secret and must be kept safe. If you accidentally expose it, you allow anyone to trigger a new build and deployment of your site. This might not seem like a big deal but you don't want people to be able to rack up build minutes on your behalf.
It will give you a URL that you can use to trigger a new build and deployment of your site and you can test it out using a CURL command to send a HTTP POST request to it.
curl -X POST -d {} https://api.netlify.com/build_hooks/<your-build-hook>Take a look at your deployments in the Netlify application and you should see a new deployment being created.
Add the build hook to your environment variables
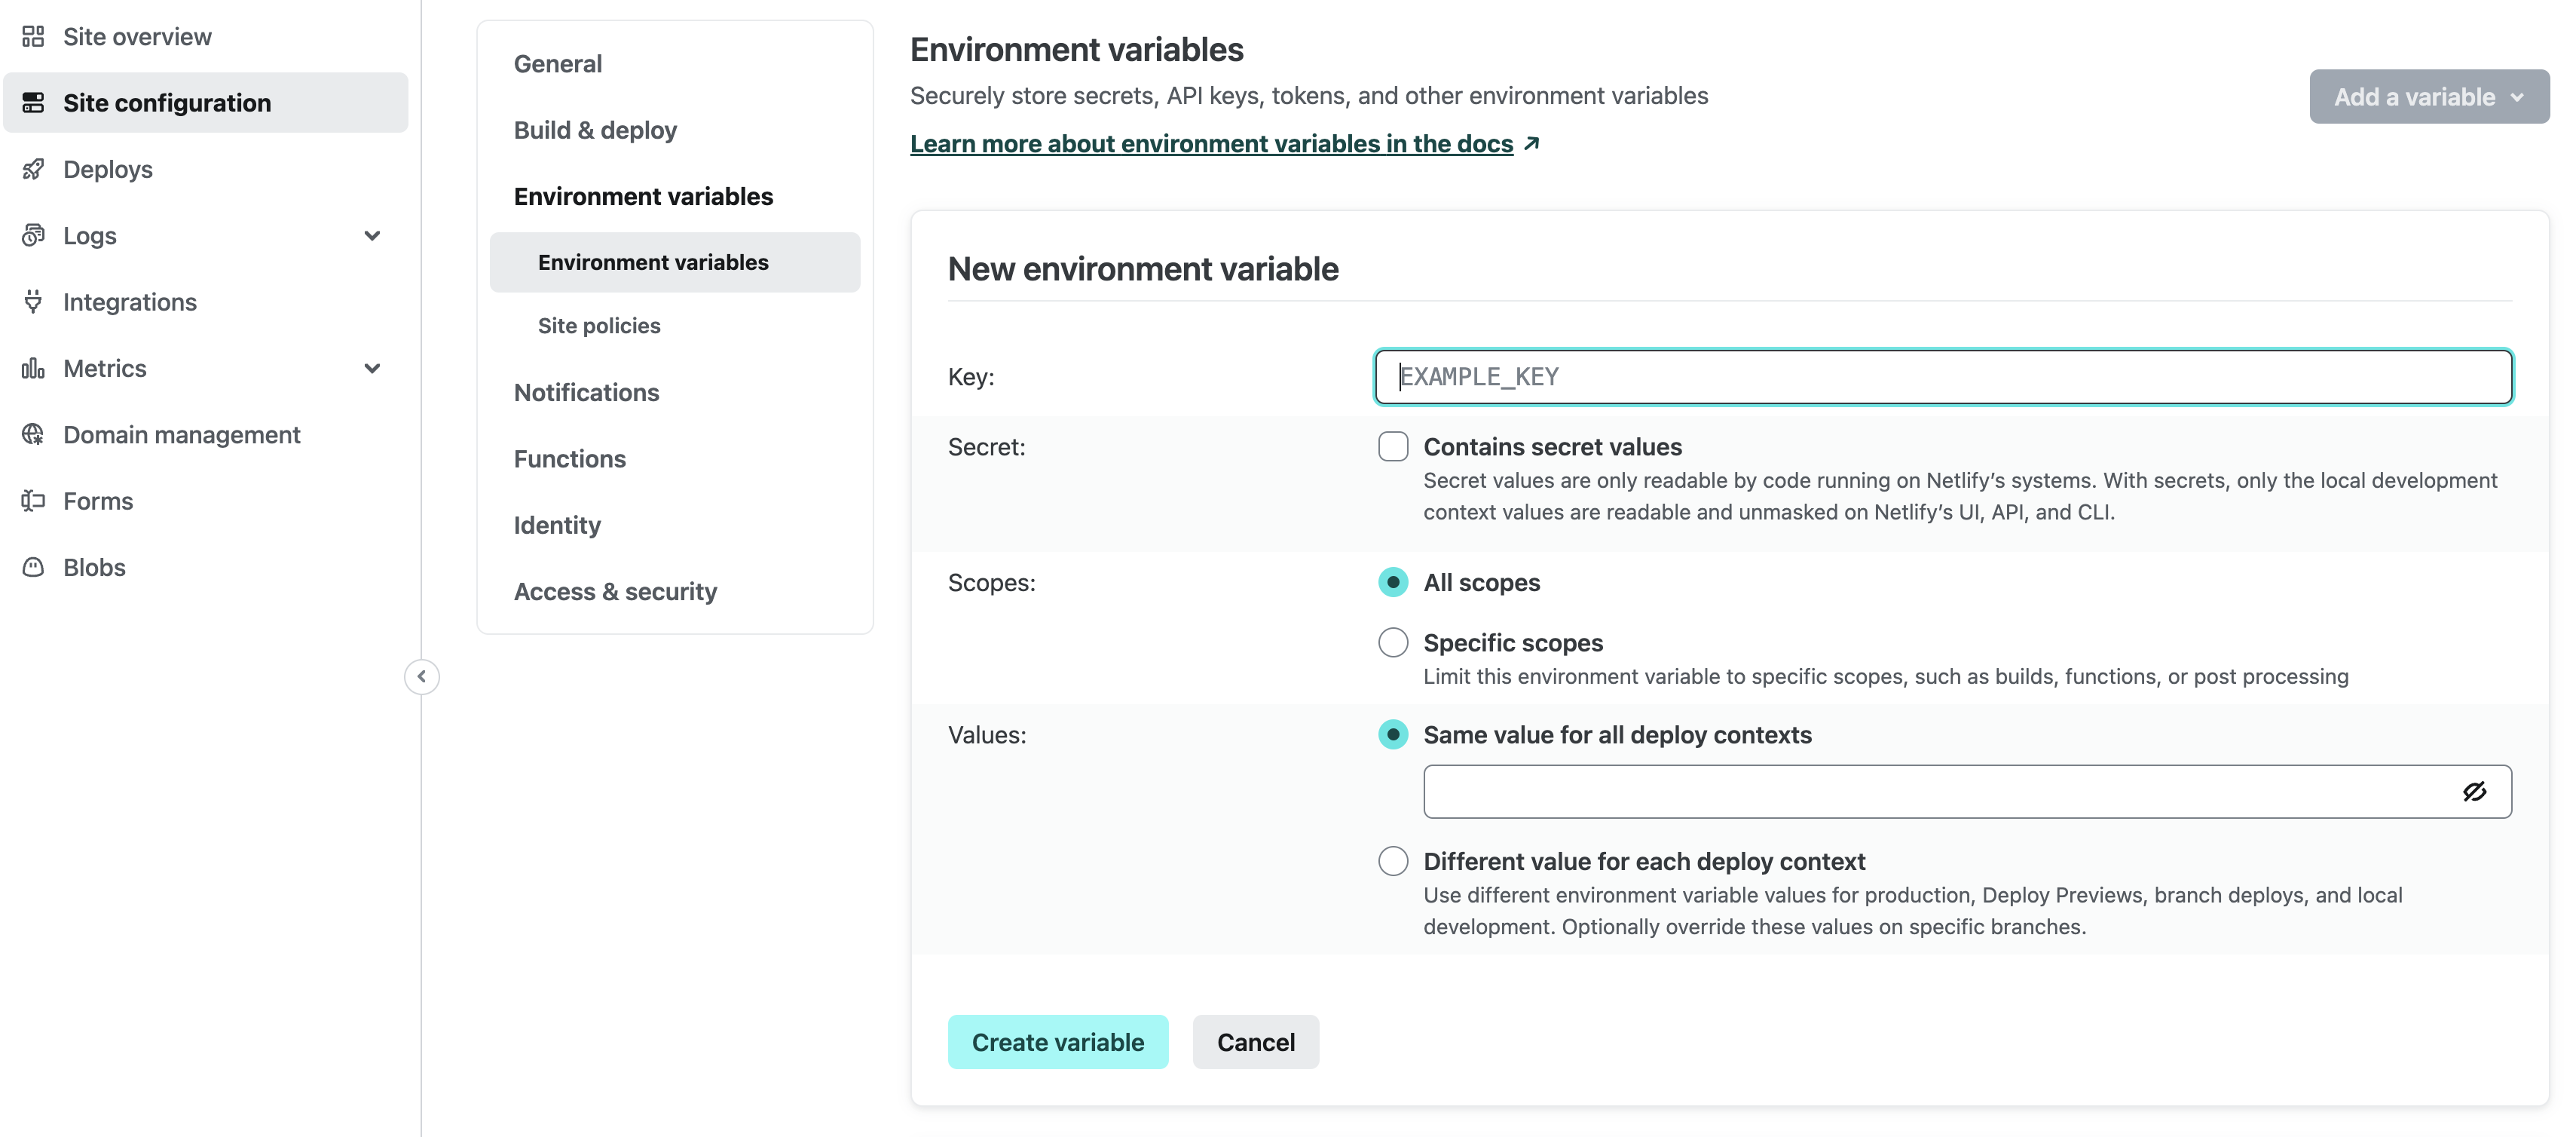
Permalink to "Add the build hook to your environment variables"To keep this URL safe, you can add it to your environment variables in your Netlify site settings. This will allow you to access it in your Netlify functions without exposing it in your code.
Go to your Netlify site settings and select the "Build & deploy" section. Scroll down to the "Environment" section, click the "Add a variable" button, and choose "Add a single variable". Add a new environment variable called NETLIFY_REBUILD_HOOK and paste in the URL of your build hook.
Note: You can limit the scope of this to "Functions" as this will only be used in our scheduled functions.
Ok great! So now we've got a build hook so let's create some code in a Netlify scheduled function to trigger it.
Adding a Netlify rebuild scheduled function
Permalink to "Adding a Netlify rebuild scheduled function"If you've never used scheduled functions before, think of them as robot workers who can automate tasks for you while you sleep and do this on a consistent schedule! 🤖
Create a new file in your netlify/functions directory called rebuild-yearly.mts. This will be the scheduled code that calls our rebuild hook.
Node.js supports two distinct module formats with different capabilities and APIs: ECMAScript modules (or ES modules), an official standard format for JavaScript packages, and CommonJS, a legacy format specific to Node.js.
I'm using the .mts file extension to indicate that the file is an ECMAScript module.
To rebuild the site, we're going to make a fetch request to the build hook URL to trigger a new build and deployment. Netlify's rebuild hooks allow us to add a query parameter to the URL called trigger_title which gives us a clearer title for the build in the Netlify dashboard. This will help us to identify why we're rebuilding the site.
Add the following code:
import type { Config } from '@netlify/functions'

// Stop TypeScript from complaining about
// the missing process.env.NETLIFY_REBUILD_HOOK
declare var process : {
    env: {
        NETLIFY_REBUILD_HOOK: string
    }
}

// An asynchronous function to call
// the Netlify build hook to rebuild your site
const rebuildSite = async (triggerTitle: string) => {
    // Construct the URL for the Netlify rebuild hook
    const url = new URL(process.env.NETLIFY_REBUILD_HOOK);

    // Add the title to the query string
    url.searchParams.append('trigger_title', triggerTitle);

    // Make a POST request to the Netlify webhook
    return await fetch(url.toString(), {
        method: 'POST',
    });
};

// Always update your footer every year! :)
export default async (request: Request) => {
    await rebuildSite('Yearly rebuild to update footer');
};

// Netlify scheduled function cron syntax
// Run every year on the 1st of January at 00:00
export const config: Config = {
    schedule: '0 0 1 1 *'
};
You have to export a config object with a schedule property to tell Netlify when to run the function. The schedule property uses the cron syntax to specify when the function should run. In my example, the function will run every year on the 1st of January at 00:00. You can use a cron generator like crontab.guru to help you generate the cron syntax but Netlify also supports cron extensions like @yearly which might be a bit easier to read.
Testing the scheduled function locally
Permalink to "Testing the scheduled function locally"You'll want to test the scheduled function locally using the Netlify CLI to check that it works as expected.
Install the Netlify CLI if you haven't already:
npm install -g netlify-cliThen run the following command to start the development server for your static site:
netlify devThis will start a local server and you can access your scheduled function at http://localhost:8888/.netlify/functions/rebuild-yearly in your browser.
You can't test scheduled functions, so you'll have to invoke the function manually. In another terminal window, you can trigger the function by running the following CURL command:
netlify functions:invoke rebuild-yearlyNote: The name of the function matches the name of the file without the file extension.
You can check the Netlify dashboard to see if a new deployment has been created. If it has, then your scheduled function is working as expected. 🎉
Updating your site footer with the latest date
Permalink to "Updating your site footer with the latest date"Now that we've got a scheduled function to rebuild our site, we can update the footer with the latest year. You can do this by using a JavaScript function to get the current year and update the footer text.
For my 11ty site I use the following liquid template code to update the footer:
<footer>
<p>Copyright © 2007-{{"now" | date: "%Y"}}</p>
</footer>Liquid templates allow the keyword now or today to get today's date and then we format it to only take the year. This will update the footer with the latest year when the site is rebuilt.
Deploying the scheduled function
Permalink to "Deploying the scheduled function"Once you're happy with your scheduled function, you can deploy it to Netlify. If you have a git repository linked to a Netlify site, you can simply push your changes to the repository and Netlify will automatically deploy your scheduled function.
You can also use the Netlify CLI. Run the following command to deploy your function to production (or leave off the --prod flag to create a deploy preview):
netlify deploy --prodThis will deploy your function to Netlify and you can check the Netlify dashboard to see your scheduled function in the "Functions" section.
Your function will now run every year and you'll see it in your deploys in the Netlify dashboard:
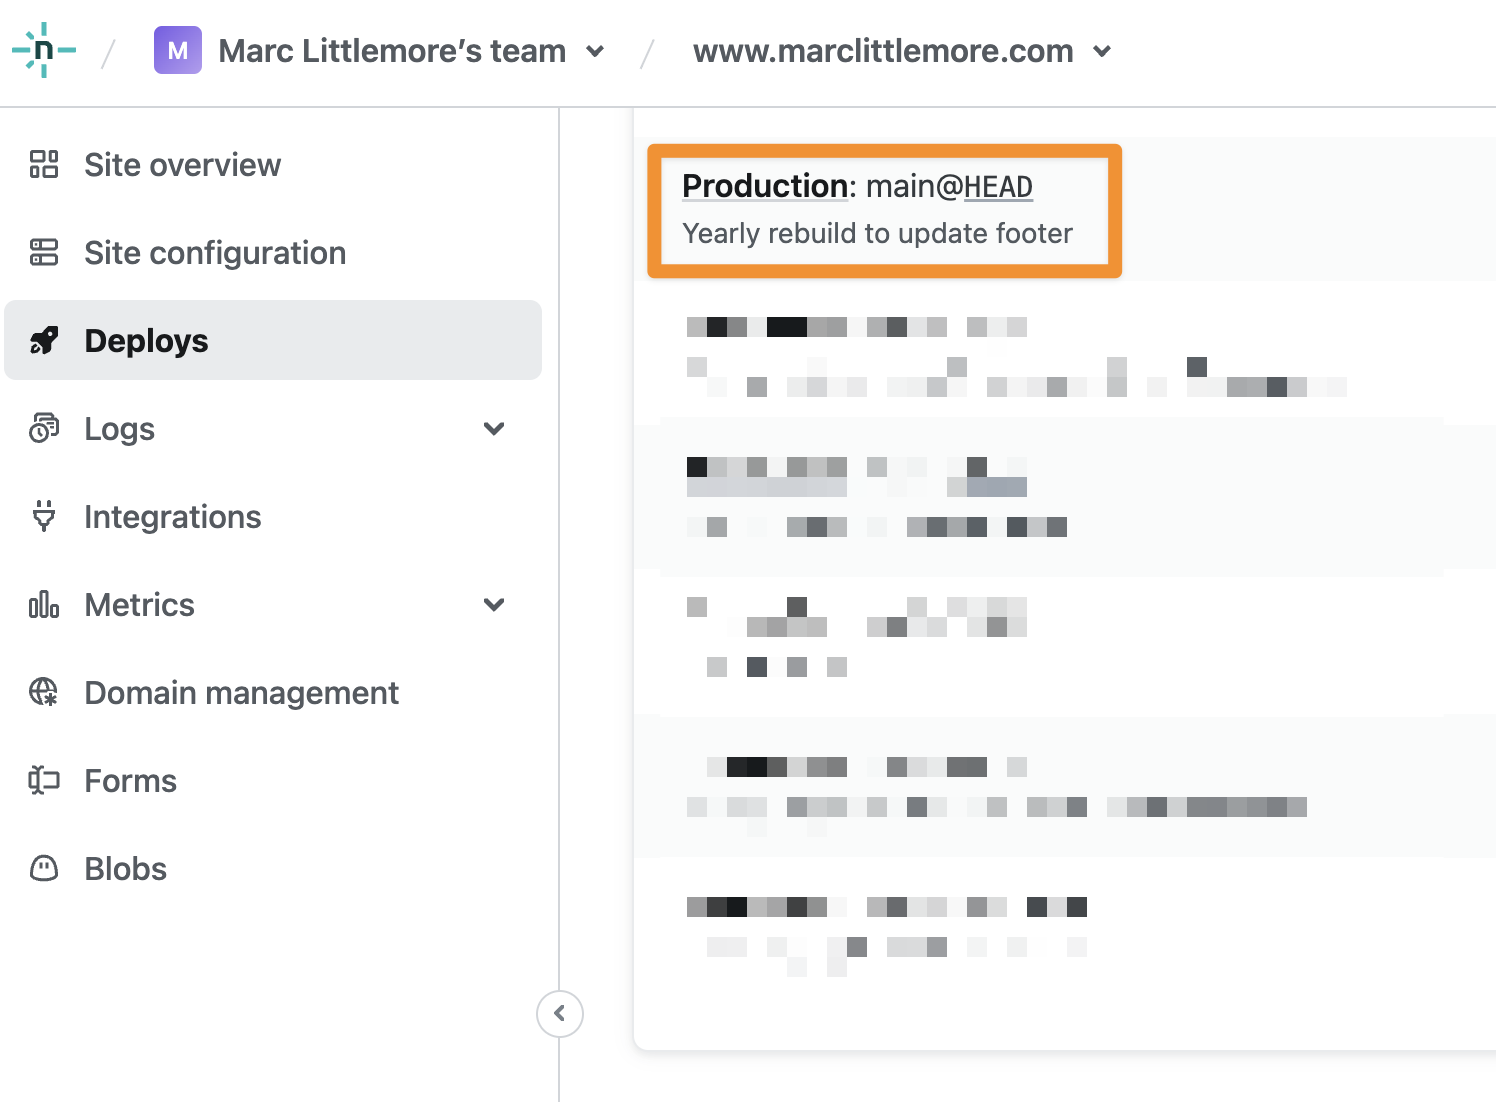
And that's it! All done! 🎉
Example use cases
Permalink to "Example use cases"I've used this to update the footer on my site but you can use this approach to automate any other tasks that you need to run on a schedule.
- Weekly newsletter updates: I use the EmailOctopus email service to send out a newsletter and each week I automatically update my site with the latest newsletter from their API.
- Scheduled blog posts: If you're missing Wordpress scheduled posts, you can do the same thing with a static site by setting a publish date in your post metadata. Use Netlify scheduled functions to automatically publish them on your site on a specific date. Remy Sharp has a great post on scheduled and draft blog posts with Eleventy which will show you how to do this.
- Activity feed: I use the GoodReads API to update my site with the latest books I've read and you can regularly update this with a scheduled function. You could do the same with Strava for your latest runs or rides, or Last.fm for your latest music listens.
- Bookmarks: Use a bookmark manager like Pocket or Raindrop.io to save your favourite links and use their APIs to update your site with the latest bookmarks you've saved.
That's all folks!
Permalink to "That's all folks!"Automating regular website updates for your static site using Netlify scheduled functions is a great way to set it and forget it. You can stop worrying about manual updates and focus on creating new content for your site.
Go and automate your static site updates with Netlify scheduled functions today! 🤖

I'm Marc Littlemore.
I’m a Senior Software Engineering Manager who works with high performing development teams and loves to help to grow other software leaders and engineers.
Want to read more?
Easily Create Gravatar Images With Eleventy
If you're moving your Wordpress site to Eleventy, you will want to convert your Gravatar images too. Find out how easy it is using an Eleventy shortcode.

Streamline Your Workflow: Automate GitLab Releases with Semantic-Release
Revolutionise your GitLab workflow with automated releases. Discover how to use semantic-release for seamless deployment.

You've got this: become a confident developer
If you're early in your software development career, you might not realise how good you are yet. Here are a few ideas to boost your confidence.
Writing great pull requests
Collaboration with other software developers is the key to great software. How do we make sure our code is merged into a project? By writing great pull requests.